![]()
![]()
![]()
![]()
![]()
![]()
![]()
![]()
![]()
![]()
![]()
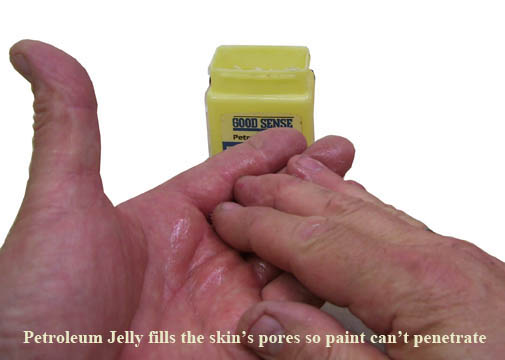

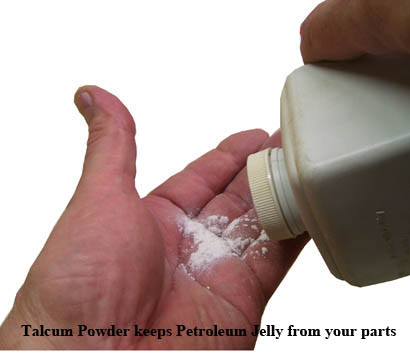
Protect your hands
 Shinlging over RoofTiles: the Front Roof
../slideshow/images/ajax-loader.gif
Shinlging over RoofTiles: the Front Roof
../slideshow/images/ajax-loader.gif
DHTMLGoodies.com
 Start the roof with cut shingles just as you did on the porch
Shingles/PorchRoof05_lg.jpg
Start the roof with cut shingles just as you did on the porch
Shingles/PorchRoof05_lg.jpg
Start the roof with cut shingles just as you did on the porch
Shingles/PorchRoof05_lg.jpg


DHTMLGoodies.com
 Fix globs of glue with a shingle; keep your fingers clean
Shingles/ShingleRoof04_lg.jpg
Fix globs of glue with a shingle; keep your fingers clean
Shingles/ShingleRoof04_lg.jpg
Fix globs of glue with a shingle; keep your fingers clean
Shingles/ShingleRoof04_lg.jpg
DHTMLGoodies.com
 Press the bottom edge shingles from the bottom to the top
Shingles/ShingleRoof06_lg.jpg
Press the bottom edge shingles from the bottom to the top
Shingles/ShingleRoof06_lg.jpg
Press the bottom edge shingles from the bottom to the top
Shingles/ShingleRoof06_lg.jpg


DHTMLGoodies.com
 This line of glue should be higher... glue right at the top is easiest
Shingles/ShingleRoof09_lg.jpg
This line of glue should be higher... glue right at the top is easiest
Shingles/ShingleRoof09_lg.jpg
This line of glue should be higher... glue right at the top is easiest
Shingles/ShingleRoof09_lg.jpg


DHTMLGoodies.com
 Alternate starting each row with a full or half shingle
Shingles/ShingleRoof16_lg.jpg
Alternate starting each row with a full or half shingle
Shingles/ShingleRoof16_lg.jpg
Alternate starting each row with a full or half shingle
Shingles/ShingleRoof16_lg.jpg
DHTMLGoodies.com
 Start each shingle low with the top of the shingle in the line of glue
Shingles/ShingleRoof21_lg.jpg
Start each shingle low with the top of the shingle in the line of glue
Shingles/ShingleRoof21_lg.jpg
Start each shingle low with the top of the shingle in the line of glue
Shingles/ShingleRoof21_lg.jpg
DHTMLGoodies.com
 The glue spreads upward as you press the shingle up into position
Shingles/ShingleRoof22_lg.jpg
The glue spreads upward as you press the shingle up into position
Shingles/ShingleRoof22_lg.jpg
The glue spreads upward as you press the shingle up into position
Shingles/ShingleRoof22_lg.jpg
DHTMLGoodies.com
 And that keeps the glue from squeezing between shingles
Shingles/ShingleRoof23_lg.jpg
And that keeps the glue from squeezing between shingles
Shingles/ShingleRoof23_lg.jpg
And that keeps the glue from squeezing between shingles
Shingles/ShingleRoof23_lg.jpg


